Are you a creative person who not able to spend money on expensive fitness equipment? Here are is a plan how to make homemade rower on your own.
Still doubt in the effectiveness? See rowing machine results.
Homemade fitness equipment is durable and reliable.
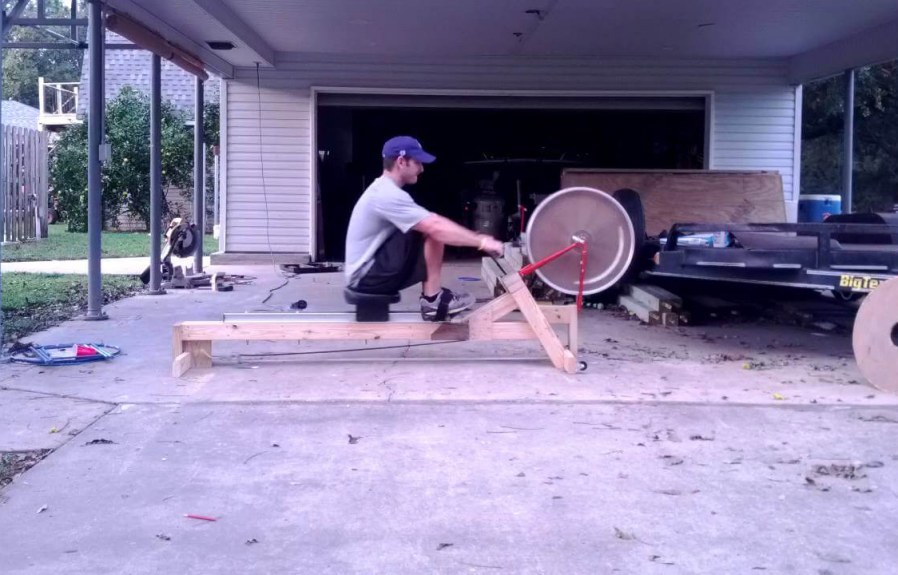
Following the simple plans, you will manage to make a DIY rowing machine for effective workouts at home. The simulator is similar to House of cards rower – durable and effective.
How to make a rowing machine?
Follow these steps with appropriate images to create a highly effective simulator (such as rowing machine 400 lb capacity) by your own hands.
- 2 bolt hooks;
- 2 hook screw;
- 10 screw rings;
- 4 spring washers of size M12;
- 8 washers M12;
- 8 hex nuts M12;
- Mounting pins M12;
- A handful of screws;
- 1 carabiner;
- 2 cable clips;
- 10 small wheels with a diameter of 3 cm;
- 2 small wheels with a diameter of 4 cm;
- Wooden beams 4×4 with a total length of 10 m;
- Wooden pole diameter 2.5 cm and 60 cm long A 88 cm long wooden board, 30 cm wide and 2.7 cm thick;
- MDF board with dimensions 99x33x1.1 cm;
- Two long aluminum strips (140 cm long, 4 cm wide and 3 mm thick);
- Elastic belts;
- 4 pulleys;
- 2 bearings with an external diameter of 32 mm and an internal diameter of 12 mm;
- Rope 2 meters in length and 10 mm in diameter.
- Glue for wood;
- Wood wax;
- Putty for wood;
- Saw;
- Screwdriver;
- Sandpaper;
- Struts;
- Wood file;
- Drill;
- Drills for drills diameter 6, 12, 15 and 32 mm.
- Separate from the wooden beams 6 short bars of 30 cm in length. Then cut both ends of each bar at an angle of 45 degrees.
- After that you need to remove from the beam 6 bars of 10 cm in length each, 2 bars of 18 cm in length, 3 bars in length 40 cm, 2 bars in length 42 cm, 2 bars in length 19 cm and another 2 bars in length 73 cm.
- Finally, make 2 long bars on 170 cm each.
- Further, drill the square recesses at one end of the bars in length 170 and 40 cm. The depth of the interval should be half the section of the beam. That is 2 cm, and length and width – 4 cm.
- Gluten the bars of 170 cm and 40 cm adhesive for the tree, putting them in recesses at right angles. Fix the design with two 30 cm long bars (with already cut corners), fastening them with two screws on the inside of the resulting straight angle.
- Measure 3 cm from the edge at the opposite end of the 170 cm bar and drill the hole with a drill 15 mm. Straight through this hole, drill a 1 cm deep recess with a 32 mm drill bit.
- Take the two rectangular fragments and fix them with a 10 cm long bar, starting at the edges with a right angle. Secure the structure with clamps and allow the glue to dry. After that, add another 10-centimeter bar at a distance of 25 cm from the edge. And add another one 83 cm from the edge.
- Take the last remaining 40 cm bar. Then measure 11 cm from both edges and make marks. Draw two squares 4 by 4 cm centered on the markings made. Draw a square recess with a depth of 2 cm on the drawn lines. Screw 42 cm to the bars of 73 cm, then drill into the two through holes with a 12 mm drill bit at a height of 20 cm.
- Now measure 120 cm and at this point screw the long beams of an unfinished frame over 42 cm of bars. Then, you need to tighten the 18-cm bar over the long ones. Do it straight between the bars of 73 cm.
- After that take another bar of 18 cm and screw it between the upper edges of 73 centimeters of bars. Therefore, the frame is almost done. It remains to fasten 2 bars of 19 cm in a vertical position between 18-inch bars, leaving a distance of about 2 centimeters between them.
- Further, it is necessary to fasten four bars of 30 cm with spanned corners, fastening them straight corners in the frame structure. Finally, fill the holes from the wood screws and apply them with sandpaper.
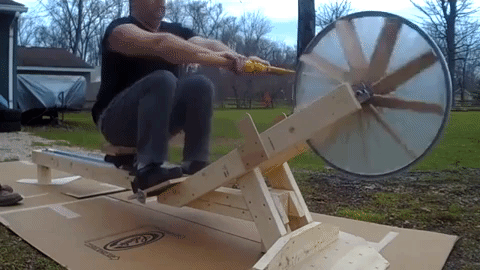
The frame is ready! If you find it hard to create your own rower, check rowing machine 350 lb capacity.
- Draw on a board of MDF two circles with a diameter of 32 cm and one circle with a diameter of 30 cm. Draw them. Then glue together so that the smaller circle is between the two large, and the centers of all the circles coincide. In the center of the resulting design, drill the hole with a 12 mm drill bit.
- Secure the pulley with bolts, inserting them into specially made holes on one of the edges of the frame. Place bearings in 32 mm and 1 cm depths. Then, connect your wooden pulley to the frame using spring and usual washers, hexagon nuts, and studs. Therefore, a wooden pulley is done.
- To begin, cut a board of 30 by 30 centimeters. After that make 2 more wooden panels in length of 30 cm and width of 8 cm. The first fragment will serve as a seat, and the other two – lateral portions.
- Then screw the side fragments to the central place. Next, twist two rows of three wheels each from the inside of the seat and two more wheels on the inner side of each side panel.
- Position them equally from the edges and each other. Afterward, fill the holes from the screws with wood putty and properly polish with sandpaper. And now it is time to remember about aluminum strips 140 by 4 cm. Screw them from the top of the long horizontal beams of the frame.
- Separate from the wooden board two panels of 26 cm in length and 12 cm in width. Then, remove two more segments of 12×6 cm. Afterward, screw the small sections at right angles to the ends of the boards more.
- After completing this, take 2 remaining 10-centimeters bar. One need to drill one 12mm hole in the side faces of each bar. After that, screw them to the board 26×12 cm (on the opposite side of the segment 12×6 cm already screwed into it).
- Then attach the steps to the frame with the help of bolts, passing through the holes 12 mm. Secure them with ordinary and spring washers, nuts, and studs. As usual, mask the holes from the screws with putty and wipe the excess.
- In the beginning, fasten two screw-hooks below the frame. And do not forget to check with the photo. From the bottom of the frame, fix 4 pulleys on one of the 10-inch bars. This bar is the most distant from the wooden pulley.
- Cut the wooden pole into two parts by 14 and 12 cm. Drill 6 holes in the longer part and 5 holes in the short, using a 6 mm drill bit. Distribute holes uniformly along the length of the segment. Screw 4 screw-rings in the center of the long section of the pole.
- After this, screw the 2 bolt hooks along the edges so that they look in the opposite direction in comparison with the four screw rings. In a shorter section, screw 5 screw-rings, but this time the middle ring must look in the opposite direction.
- In our case, we used elastic belts of 85 cm in length. Secure them with hooks on the screw-rings of a more extended section of the pole. After that, unclip or cut the hooks at the opposite ends of the straps and pull them through the pulleys. Then return the hooks to the place and fix them on the rings in a 12-centimeter piece of the pole.
- Also, cut 30 cm off the wooden pole. Drill in the center of the handle a hole with a diameter of 6 mm and screw in it the last screw-ring. Click on the carabiner, passing it through the screw-ring. After this, pass through the carbine rope and fix it with a cable clamp.
- Spend the rope under the frame and hold it around a large wooden pulley. Attach the cable to the screw-ring on a short piece of a piece of 12 cm long and securely clamp it.
- First, drill a wooden cube with a 4 cm face. Then cut it diagonally.
- Few 2 fragments obtained to the wood “legs” of the frame – vertical bars of 73 cm long. Place them in the direction of the wooden pulley, 2 centimeters from the ends of the legs.
- After completing this, attach the wheel to each base. Finally, carefully cover all wooden elements with a layer of wax.
- To adjust the resistance of the simulator under its physical form, remove the hooks of the elastic belts from the rings. And if you want to return the initial load – return the hooks to the place. The more resistance, the more calories you burn and the faster your back and muscles begin to get sick.
- If you are accustomed to bringing yourself to complete exhaustion, then practice with 4 attached belts. It will strengthen your cardiovascular system and increase endurance.
- With this hand support, you can more effectively pump biceps. Cut 2 bars of 31 cm in length and 2 more bars of 23 cm in length. Cut one of the ends of each beam at an angle of 45 degrees.
- After this, prepare 2 bar lengths of 35 cm and another one 14 cm in length. Next, you will need to make a wooden panel 30 cm long and 24 cm wide, and two more long pieces of 35 cm long and 3 cm wide.
- Glued boards 35×3 cm to 35-centimeter bars, placing them at right angles and parallel to each other. Screw a 31-centimeter bar with a cut angle, centered around the perpendicular structure.
- Repeat the procedure with the second set of fragments and fix two identical structures by screwing a 14-inch bar between them.
- Screw the panel 30 to 24 cm to the cut corners of the 31 cm bar. For additional stability between the panel and the base insert two supports in the form of bars of 23 cm with cut corners. Then firmly fasten with screws.
Finally, hide the hinges of the wood screeds, apply sandpaper and cover everything with a uniform layer of wax. In case you need a highly effective rower, buy now Marcy rm413 rowing machine.
Bestsellers on Amazon:
Homemade rower plans
Today you can find any sports inventory on the market.
But the prices are sometimes too high, so there appears the thought about homemade fitness equipment. Especially when you are keen on making things yourself.
In fact, making homemade rowing machine with accurate plans is not so difficult. If you wish, you can even create your home gym, with your own sports inventory. The DIY inventory doesn’t differ much from those you buy, the main idea is your desire.
Of course, you will not manage to make the durable simulator, not spending money. You will need special tools and materials. But the price is much lower than that of analogs on the market.
DIY inventory plans for home gym
To make the homemade gym for fitness and bodybuilding, you should choose simulators having the most simple construction. The equipment you are going to make should be productive for growing strength and muscle mass. As well as it should be highly durable.
Simulators are made according to the following principle:
Lifting weights involving special muscle groups. At popular fitness centers and gyms, you can observe that beginners use simple equipment. While advanced users prefer spending the most time with barbell or dumbbell.
While proper usage, the latter equipment makes your any body part work. For making it work effectively, you need to choose suitable exercises and weights. The home gym will not be complete without horizontal bars – homemade simulators, which are quite easy to make.
A homemade rowing machine is a necessary part of your home gym. It makes all body muscles work, including hands, shoulders, hips, and buttocks.
Consider the benefits of homemade rower:
- During 30 minutes of intensive work with the DIY rowing machine, you will burn an average of about 500 calories. This is almost twice the number of calories you burn while running and cycling.
- Due to the regular, extended in time work of all muscle groups, the rowing machine boosts your metabolism. It improves your blood circulation, lung capacity, trains the heart muscle and increases endurance.
- In addition, exercises with a rowing machine (applying the correct technique) are practically safe for the joints, which cannot be said about running, for example.
For a beginner, just looking at the DIY rowing machine plans causes fear with a lot of questions. How to train with it? Do I work with legs or arms?
Why do my shoulders feel pain? And why do my legs continue to slip out of the holding straps? Believe us that you are not alone.
The most important thing to remember when using a rowing machine is that it’s not about speed but about strength – says Melody Davis, a rowing trainer in New York (USA).
If you leave the rowing session with back pain, then you are doing something wrong, says Davy. Instead of the back, focus on the lower body muscle work, such as buttocks, hamstrings, quadriceps. Just push yourself out and then slide back smoothly.
Rowing simulator implies using special techniques. See the Marcy rower machine review where you find the correct rowing workout technique.
But before, you need to know 2 main factors of successful training:
1. A number of strokes per minute
How many strokes (or cycles) you do per minute. Keep that number close to 30 or a little less. Remember, this is about strength, not about the speed of throwing the body back and forth.
2. Unit of time
How much time you spend walking 500 meters with strokes (the simulator display counts the number of strokes and converts them into meters). Target is 2 minutes or less. To increase the speed, push faster, not just with your hands.


Discussion about this post